
")
Rework in 2017
Cylinder head revision and dyno test
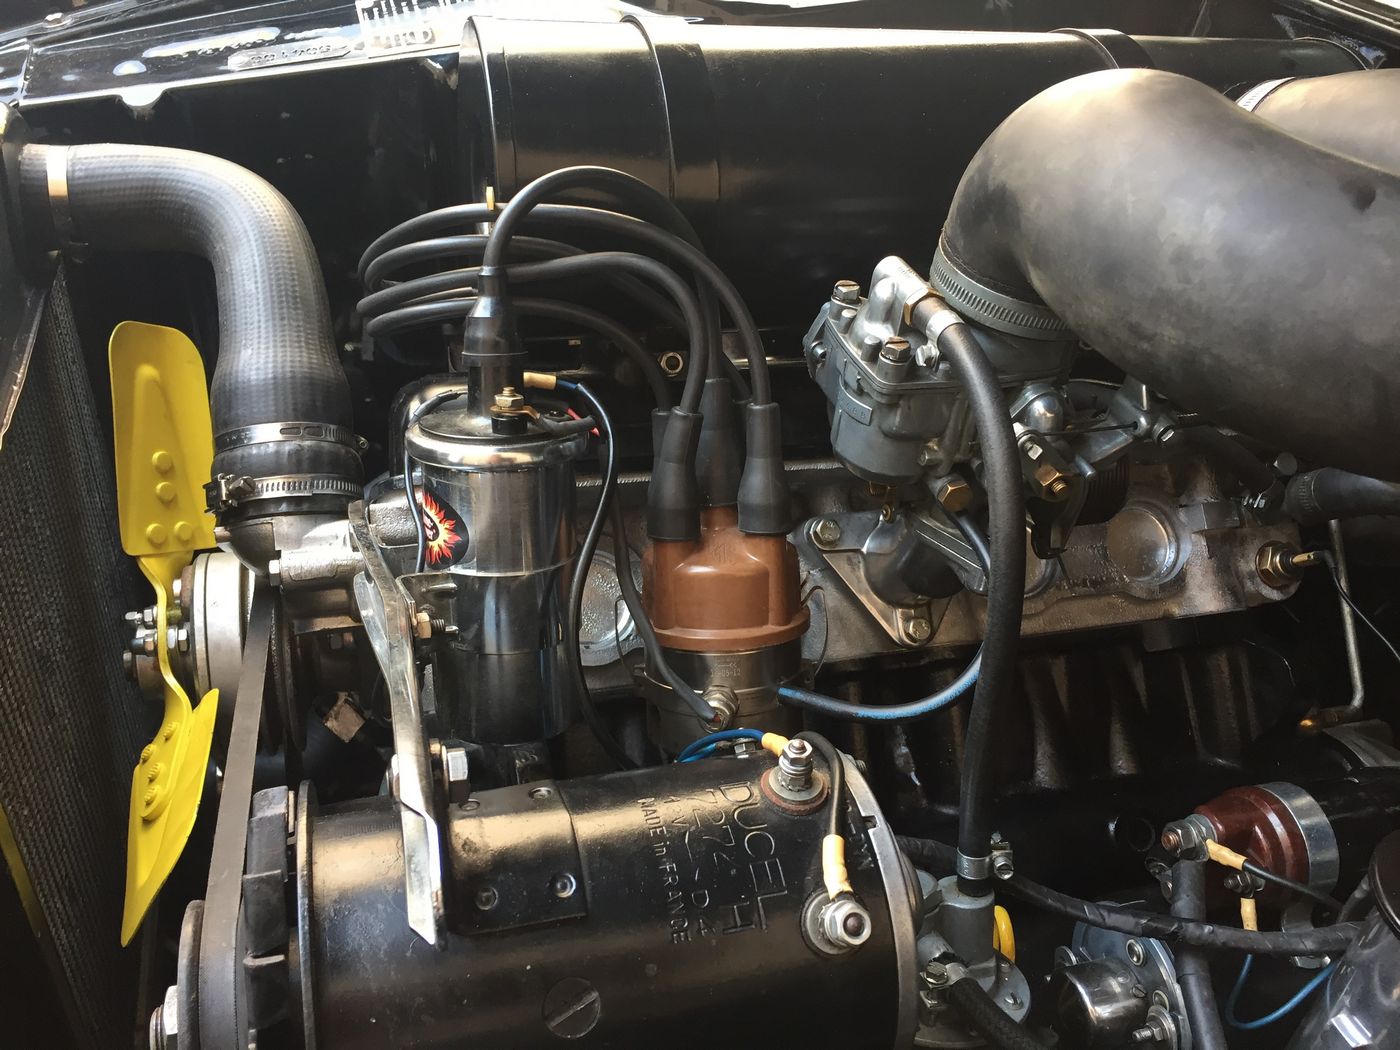
After the removal of the cylinder head the problem became clear. With the cylinder head upside-down on the workbench, we poured a little diesel oil into the combustion chambers. Cilinders 3 and 4 were nice and tight, but the inlet values of 1 and 2 were leaking badly. The values turned out to be bend at the end of the stem and needed to be replaced. In the process also the value springs were replaced by Peter van Giersbergen in Silvolde. These people also cleaned and tested the cylinder head again so that we could give it another try.

With the cylinder head removed, we had the opportunity to make a clean mark on the crankshaft pulley to test the ignition properly. The original '64 404 does not have that as the ignition is adjusted using a hole in the bell housing of the clutch. After the re-install of the cylinder head and reconnecting all the hoses and wirings, the engine was started up again. Immediately it ran much smoother. We had good torque and much more power. However after taking it for a couple of runs though, the spark plugs did not quite have the right color: in stead of a nice brown 'milk-chocolate' color, they were too white, indicating a lean mixture. And indeed we could feel an occasional misfire, but still much better than before the cylinder head fix. After some research we replaced the main jet in the Solex 32 PBICA carburetor. from the standard '125' to '130'. This gave some improvement.
As we were struggling a while with the carburetor settings, we made an appointment to test the 404 on a dyno. Just the evening before we installed an even larger main jet of '137'. Driving to the dyno at Onixx in Lichtenvoorde at we realised that this was a good decision. It was really pleasant driving now. The engine was very smooth and responsive, the gears worked perfect, no more noise in the gearbox, smooth gear shifts: a new car.

The testing on the dyno indeed proved that all of the settings were indeed correct. Ignition timing and advance, as well as the carburetor settings. The HC in the exhaust were nice and low, which is an indication of a properly functioning engine. Also the CO reading was as is it supposed to be. Finally the power and torque tests revealed that the engine delivered a max of 71pk, which is more or less the spec as it came out of the factory in 1964. One may not be very interested in the maximum power of such a car, but the nice thing is, that it can only be reached this maximum if and only if everything is set correctly. The explanation why a bigger jet is required is that the today's fuel is not the same as the fuel back in those days. The 404 is now officially ready for the road.
Paintwork ready and building up

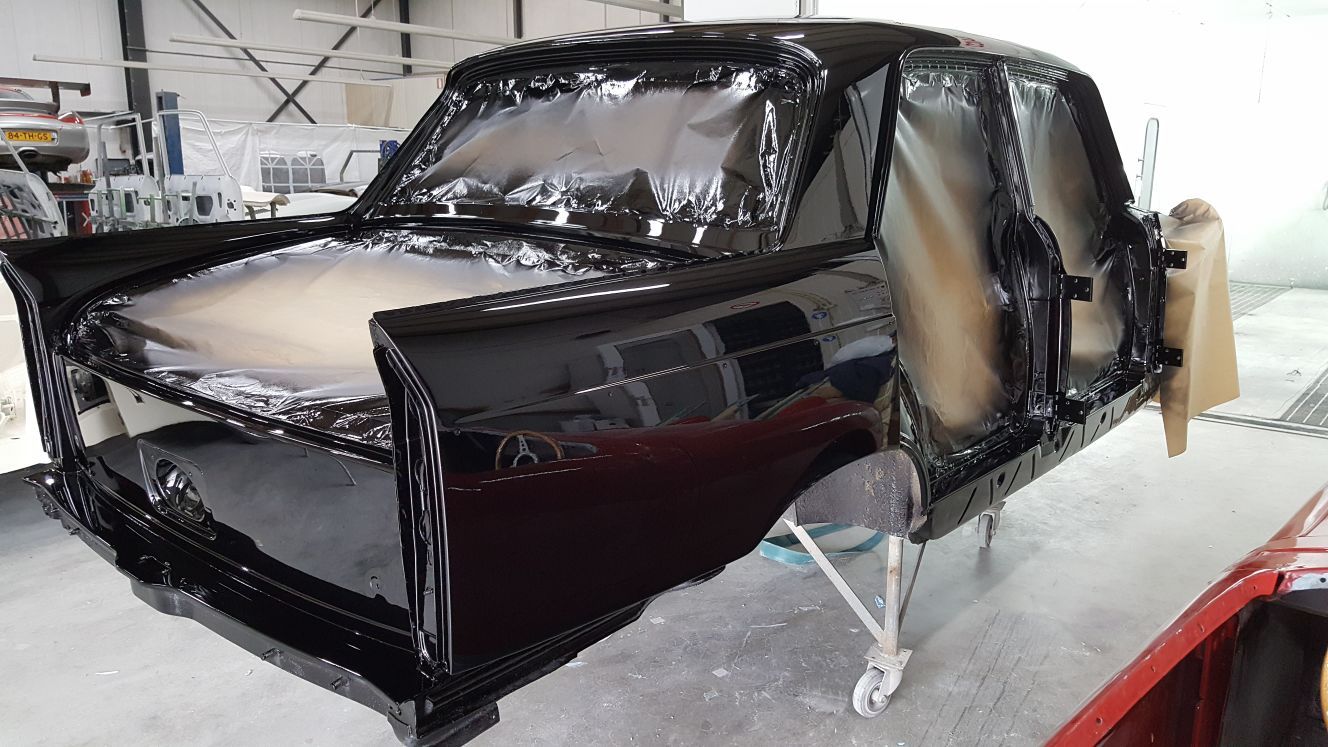
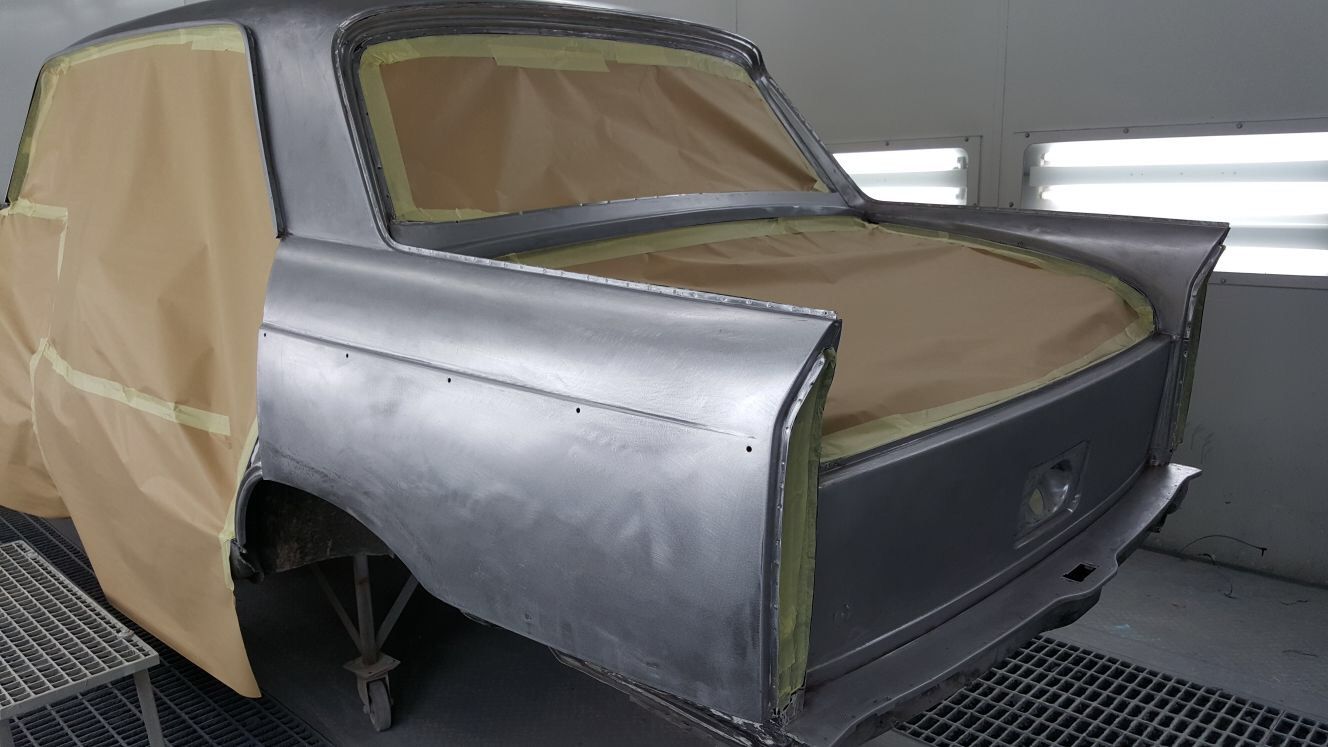
At John Hurenkamp the body shell was making progress. The engine compartment as had some minor rust in the corners. That was carefully removed before the primer was applied. After primer, some minor filler and again primer, the final coat of the original Peugeot black color was applied. The result looked absolutely perfect, as if looking into a black mirror, exactly the way it should be. It is always a bit scary to start working on the car once the paint job is done. The first thing to do was putting the body shell back on its own wheels. First the rear axis and then the front cross member, followed by the front suspension. With the gearbox back in place, we were able to remove the dolly and put the car back on 4 stands.

We already decided to replace all the brake lines with modern Cunifer brake lines. They are a little harder to work with as the material is a little harder than normal copper, but it is much more durable. So we bought 7 meters of 1/4" Cunifer brake line plus a tool to make the double flare ends, a tool to make the brake line nice and straight and a bending tool to make nice turns. So even from underneath the car everything looks nice and tidy. Bit of an investments, but it is worth it.
We filled up the brake system with DOT5 brake fluid, which has the advantage that is it not hygroscopic as is the standard DOT3/4. These type of cars are not used very often, standard brake fluid typically leads to corrosion in the brake cylinders, causing leakage and in some cases cylinders can seize up completely. Let us see how this brake fluid is going to be an improvement or not.
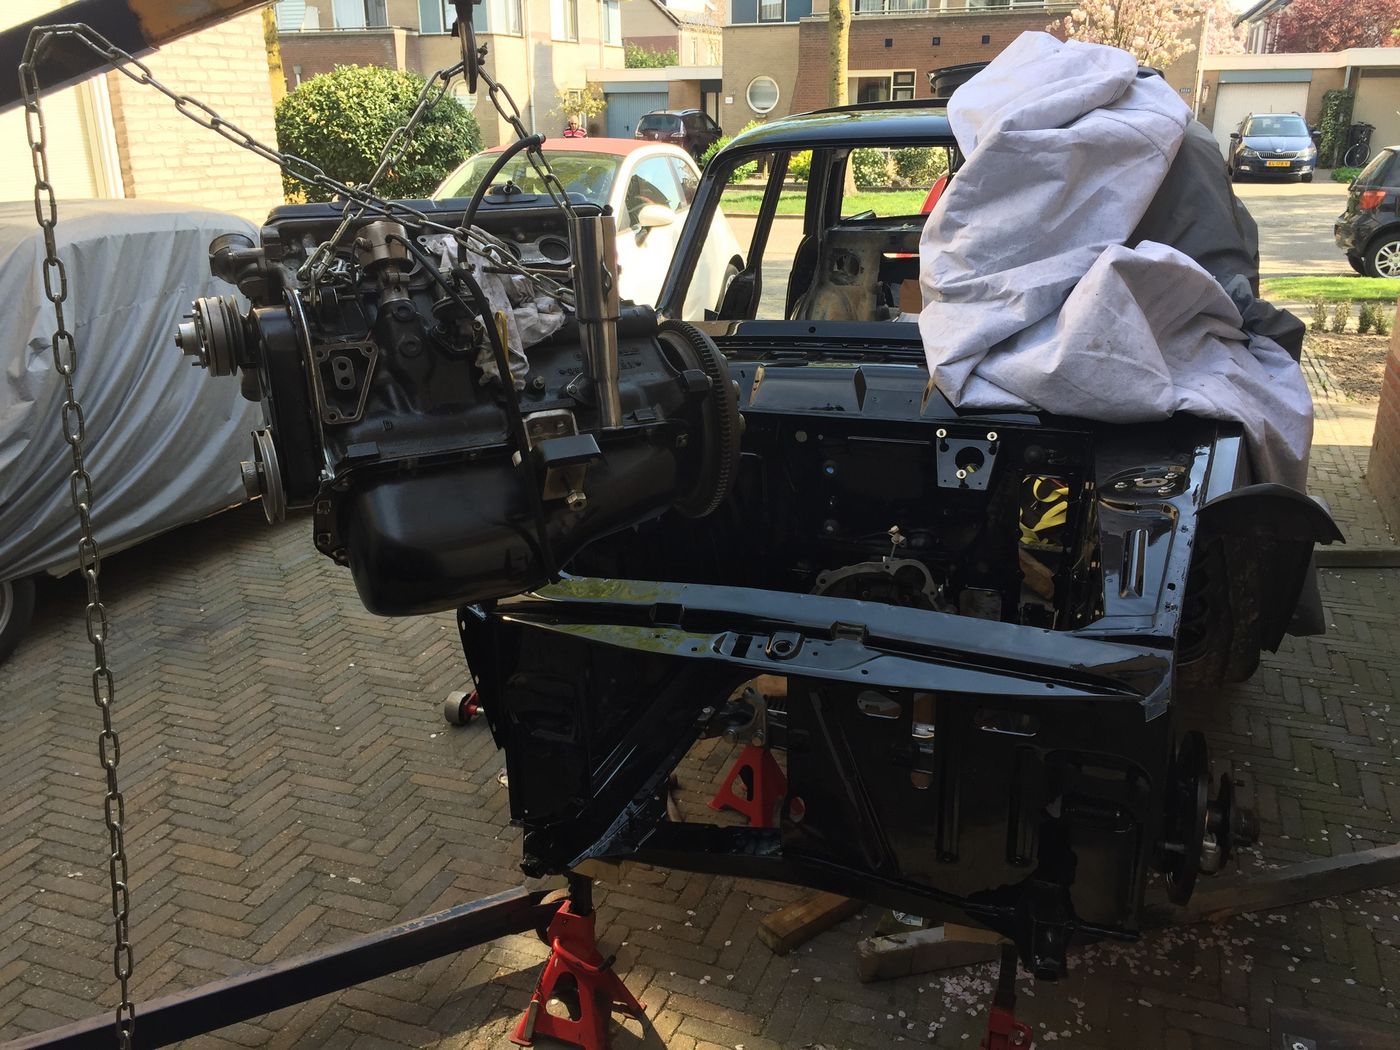
The next step in the assembly was to put the steering column, dashboard and wiring back in the car, followed by the engine and the engine compartment accessories such as starter, generator, distributor, etc. The last bit was to put the seats back in place and finally the head liner and windows.Now it was time to start up the engine again. We have done this a couple of times before. So we knew the drill. Oil in the engine, plugs still out, and crack the engine until there is oil pressure. That came up pretty quick, which is a good sign. After that the engine fired up without too much trouble to that the final adjustments of the ignition and carburetor could be made.
Now that was the moment where things started to fail. With the ignition set correctly with a timing lamp, the carburetor could not be adjusted to make the engine run smoothly. The block was rocking back and forth. Running the car for a few kilometers did not help. The engine had little power even with the engine warmed up. Cleaning out the carburetor again did not help. In fact nothing helped. We checked the valve clearances again, maybe something was wrong there, but no everything was spot on. So then the next step was to go back to square one: Check the compression and that revealed the issue: cylinder 1 and 2 hardly had any compression: the cylinder head had to come off again.
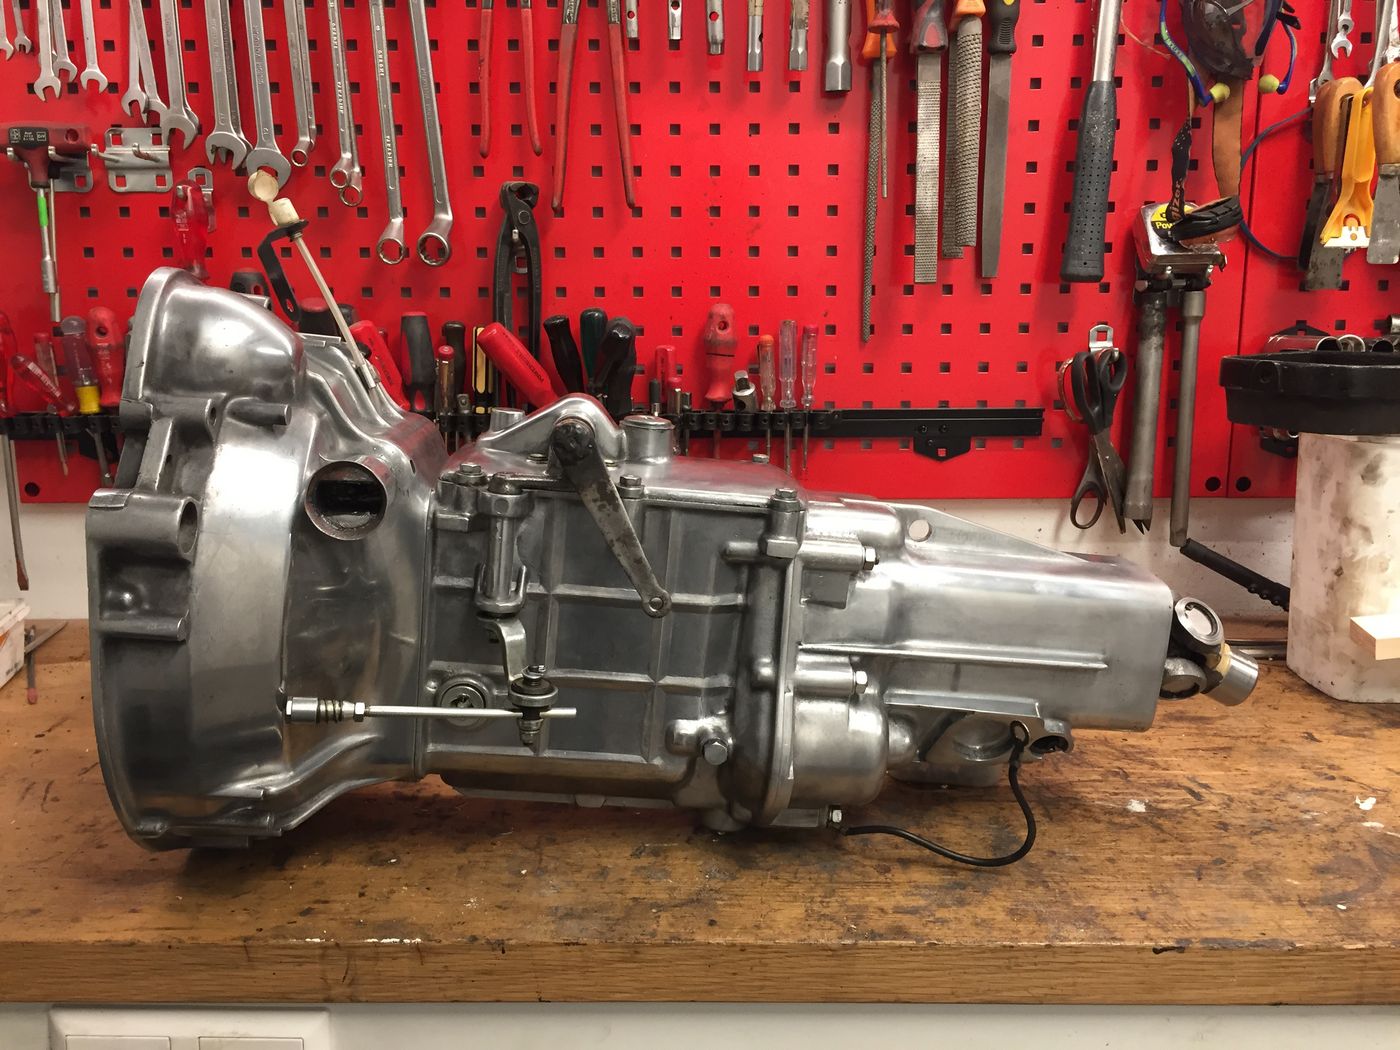
Gearbox revision
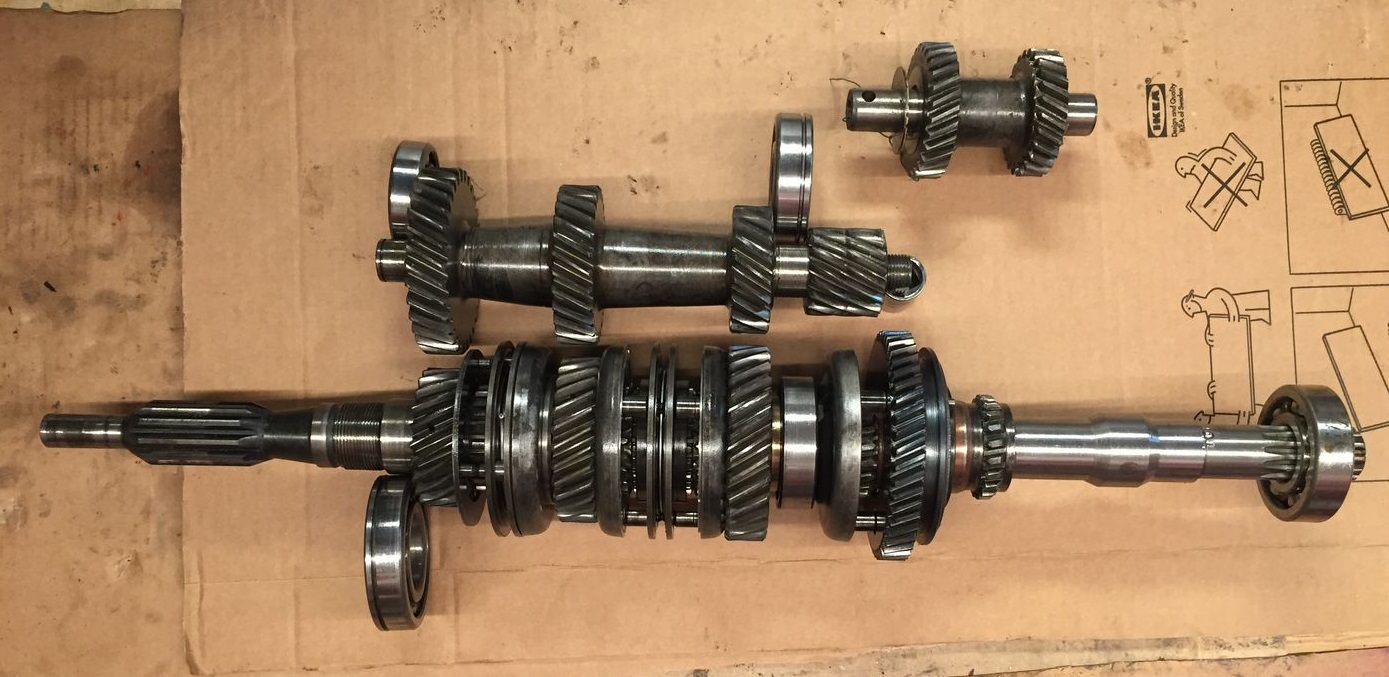 Because we had to take out the gearbox to redo the bodyshell paintwork, it was a good moment to take it apart for a thorough investigation. In our case there was some leakage at the top and near the speedometer drive socket. Moreover there was also a bit of bearing noise. In general this so-called C3 box is pretty robust and indeed in our case there was not much wrong with it. So we only needed to replace the bearings, the seals and gaskets to make this gearbox ready for the next so-any years. On the picture here one can see all the gears without the box and the the new bearings right next to it. A C3 box is really not that complicated. Some special tooling is required, but with a bit of creativity and connections it is easy to do. Before we assembled everything, we first cleaned the housing and gave it a good polish. It has to look nice too!
 The column shift of the 404 is nice, but it has its downsides. After a while wear on the control rods can make the gear shifting difficult. Fortunately a revision set is available to replace all the parts that are prone to wear. Since we have the steering column disassembled, we might as well give it a new layer of paint. Very curious how the shifting will be once the car is back together...
Sanding the body shell
 We started sanding down the body shell. All parts that can be detached from the body shell were removed These parts we handed over to a person that can submerge the parts to remove the paint: Martin Dijkhof.It became clear that too much filler was used the previous time. There was still quite a bit of sanding required to get it all free of paint and filler. The thick layer of filler was no doubt the reason for the blisters that appeared in the paintwork after a while. Next time we will make sure less filler is used. The good news from stripping the paint was that there was little rust to be discovered. No welding work was required. Just a little local sand blasting and applying the primer. Even the doors turned out to be in good shape. Usually one find a lot of rust once all the paint is stripped. This was just a fortunate exception to the rule..
 Back to the body shell. It was not easy to strip the paint down to the metal. We tried many different ways, but good old sand paper turned out to be the way to go. Just takes long time and produces a lot of dust. In the end we looked for help and found that with John Hurenkamp in Andelst. He has somewhat better equipment and can deal with the dust problem a little better. As with the stripping of the separate parts, here too a lot of filler was used. With the repainting of the car we will make sure we use less and a different type of filler. On some places filler was used to fill up dents. It is better to make the panels straight by itself so that less filler can be used. The body shell too had little rust. Just a few small spots, but we will need no big welding projects to make this car look great again.
Start all over ...
The last couple of years more and more blisters started to appear in the paintwork. At first it seemed to be a local issue on the top of the car and the bonnet. But after closer inspection we found blisters all over the place. At a particular bad spot we removed the paint and found that the primer was delaminated from the metal and a we could see corrosion starting to form. It became clear that the only solution was to sand the body shell down to the metal and start all over with the paintwork. It turned out that filler that was used back in 2002 was not a good choice. This time we would pick better material. We also found out that too much filler was used on the car, while there was not really a reason to. The person that helped us with the paintwork of the MGA did a great job, so we turned to the same person and asked for advice. His recommendation was clear but painful: remove everything from the car and the rub the body shell back to the metal. That is what we did.